- Published on
An Introduction to Google Test
- Authors

- Name
- Daisuke Kobayashi
- https://twitter.com
I started using googletest.
Over the last few months, I built an SDK for controlling a product that uses industrial cameras from an external application. Because it was a new product, I was trusted with everything from the design onward. I took that as a chance to introduce some new practices, such as deciding on a coding style and adding tests. I had never seriously used a testing framework before. My impression after using it was that, yes, writing tests is a hassle, but they were extremely useful when deciding whether a change was safe to commit or release. I would definitely like to use them again next time.
The SDK was probably under 10,000 lines of code, and I only wrote tests for the public API exposed to users. I may not have used the framework to its full potential, but I would like to introduce the parts I actually used. I will not try to explain how to design tests well, because I am not really in a position to do that.
Installation
Download the latest version from googletest and build it. Change the runtime-library linkage format as needed for your environment. Once the build is complete, you get the following two libraries.
gtest.libgtest_main.lib
When using them, add the include path and link both gtest and gtest_main. If you link gtest_main, you do not need to write your own main function. If you do not link it, you need to provide main yourself.
If you write main, it looks like this.
int main(int argc, char** argv) {
  ::testing::InitGoogleTest(&argc, argv);
  return RUN_ALL_TESTS();
}
Basic usage
Define tests with the TEST() macro. The basic form is as follows.
TEST(test_case_name, test_name) {
.... test body ....
}
For example:
#include <gtest/gtest.h>
int Increment(int val) { return val + 1; }
int Decrement(int val) { return val - 1; }
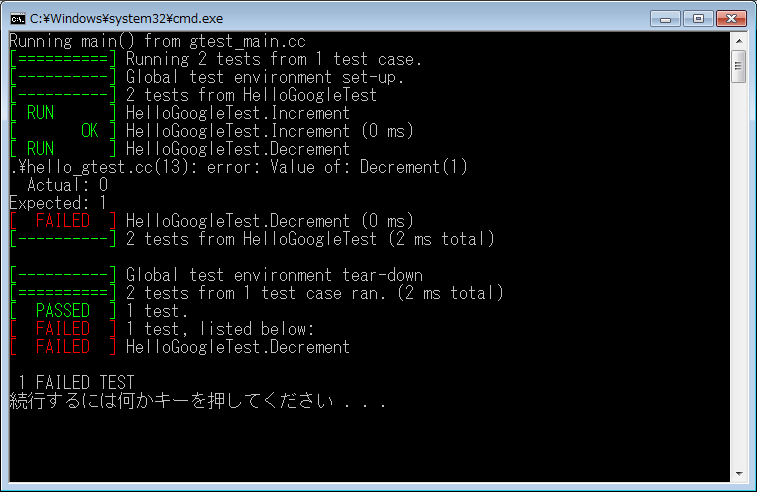
TEST(HelloGoogleTest, Increment)
{
EXPECT_EQ(2, Increment(1));
}
TEST(HelloGoogleTest, Decrement)
{
EXPECT_EQ(0, Decrement(1));
}
Inside the TEST macro, you check return values and other conditions with EXPECT_XX or ASSERT_XX macros. There are many of these depending on the type of check, but in the SDK I wrote, I only used the following ones. See the reference link for details.
| Macro | Meaning |
|---|---|
EXPECT_EQ | Checks whether two values are equal |
EXPECT_TRUE | Checks whether the value is true |
EXPECT_DOUBLE_EQ | Checks whether two double-precision floating-point values are equal |
EXPECT_STREQ | Checks whether two C strings are equal |
If a test succeeds, the output shows OK. If it fails, it shows Failed along with the actual values.

In many cases, that is enough. However, when you test classes, you may want to share setup and teardown logic across tests. In that case, you need to structure the tests differently depending on the scope of the shared data, as described below.
Sharing resources across multiple tests
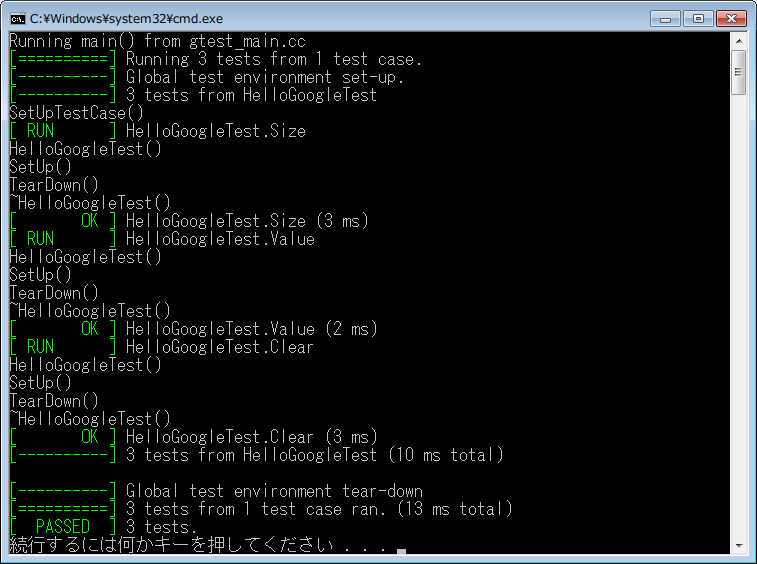
If you want to initialize the same data for each test, use a test fixture. In the sample below I only show initialization, but setup and cleanup are handled with SetUp and TearDown.
#include <iostream>
#include <vector>

#include <gtest/gtest.h>

namespace {

class HelloGoogleTest: public ::testing::Test {
protected:
  HelloGoogleTest()
  {
    std::cout << "HelloGoogleTest()" << std::endl;
  }

  ~HelloGoogleTest()
  {
    std::cout << "~HelloGoogleTest()" << std::endl;
  }

  virtual void SetUp()
  {
    std::cout << "SetUp()" << std::endl;
    vec_.push_back(0);
    vec_.push_back(1);
    vec_.push_back(2);
  }

  virtual void TearDown()
  {
    std::cout << "TearDown()" << std::endl;
  }

  static void SetUpTestCase()
  {
    std::cout << "SetUpTestCase()" << std::endl;
  }

  static void TearDwonTestCase()
  {
    std::cout << "TearDownTestCase()" << std::endl;
  }

  std::vector<int> vec_;
};

TEST_F(HelloGoogleTest, Size) {
  EXPECT_EQ(3, vec_.size());
}

TEST_F(HelloGoogleTest, Value) {
  EXPECT_EQ(0, vec_[0]);
  EXPECT_EQ(1, vec_[1]);
  EXPECT_EQ(2, vec_[2]);
}

TEST_F(HelloGoogleTest, Clear) {
  EXPECT_EQ(3, vec_.size());
  vec_.clear();
  EXPECT_EQ(true, vec_.empty());
}

} // namespace
The screenshot below shows the output of that test run. SetUp and TearDown are executed for each test.
Sharing resources across tests in the same test case
In the previous section, initialization ran every time a test started. Sometimes initialization is expensive, and you want to run it only once before the whole group of tests. In that case, define static variables and perform initialization and cleanup in SetUpTestCase and TearDwonTestCase.
In the screenshot above, TearDwonTestCase does not seem to have run for some reason, but you can see that SetUpTestCase is executed only once at the start of the test case. This is the behavior you can use.
#include <gtest/gtest.h>

namespace {

class HelloGoogleTest: public ::testing::Test {
protected:
  HelloGoogleTest()
  {
  }

  ~HelloGoogleTest()
  {
  }

  virtual void SetUp()
  {
  }

  virtual void TearDown()
  {
  }

  static void SetUpTestCase()
  {
    Initialize(system_);
    device_ = OpenDevice(system_);
  }

  static void TearDwonTestCase()
  {
    CloseDevice(device_);
    Finalize(system_);
  }

  static System* system_;
  static Device* device_;
};

System* HelloGoogleTest::system_ = NULL;
Device* HelloGoogleTest::device_ = NULL;

} // namespace
Initialization that runs when testing starts
Define a class derived from ::testing::Environment, override SetUp and TearDown, and pass an instance of that class to ::testing::AddGlobalTestEnvironment from main.
namespace {

class TestEnvironment : public ::testing::Environment {

  virtual void SetUp()
  {
    // Initialization at program start
  }

  virtual void TearDown()
  {
    // Cleanup at program exit
  }

};

} // namespace

int main(int argc, char** argv) {
  ::testing::InitGoogleTest(&argc, argv);
  ::testing::AddGlobalTestEnvironment(new TestEnvironment);
  return RUN_ALL_TESTS();
}
Writing a test report
Pass an argument when running the test executable. By default, the result is written to test_detail.xml.
test.exe --gtest_output=xml
If you want to change the file name, add it to the option like this.
test.exe --gtest_output=xml:test_report.xml
That produces a file like the following.
<?xml version="1.0" encoding="UTF-8"?>
<testsuites tests="3" failures="0" disabled="0" errors="0" timestamp="2014-02-26T16:46:06" time="0.017" name="AllTests">
  <testsuite name="HelloGoogleTest" tests="3" failures="0" disabled="0" errors="0" time="0.013">
    <testcase name="Size" status="run" time="0.004" classname="HelloGoogleTest" />
    <testcase name="Value" status="run" time="0.002" classname="HelloGoogleTest" />
    <testcase name="Clear" status="run" time="0.004" classname="HelloGoogleTest" />
  </testsuite>
</testsuites>
Adding extra output to the report
If you want to add custom items to the test report, use the RecordProperty function.
#include <iostream>
#include <vector>

#include <gtest/gtest.h>

namespace {

class HelloGoogleTest: public ::testing::Test {
protected:
  HelloGoogleTest()
  {
    std::cout << "HelloGoogleTest()" << std::endl;
  }

  ~HelloGoogleTest()
  {
    std::cout << "~HelloGoogleTest()" << std::endl;
  }

  virtual void SetUp()
  {
    std::cout << "SetUp()" << std::endl;
    vec_.push_back(0);
    vec_.push_back(1);
    vec_.push_back(2);
  }

  virtual void TearDown()
  {
    std::cout << "TearDown()" << std::endl;
  }

  static void SetUpTestCase()
  {
    std::cout << "SetUpTestCase()" << std::endl;
  }

  static void TearDwonTestCase()
  {
    std::cout << "TearDownTestCase()" << std::endl;
  }

  std::vector<int> vec_;
};

TEST_F(HelloGoogleTest, Size) {
  RecordProperty("ID", 0);
}

TEST_F(HelloGoogleTest, Value) {
  RecordProperty("ID", 1);
}

TEST_F(HelloGoogleTest, Clear) {
  RecordProperty("ID", 2);
}

}
Running the test above produces a file like the following. RecordProperty only supports output of type std::string and int, so if you want to write something like a double, convert it to a string first with ::testing::PrintToString.
<?xml version="1.0" encoding="UTF-8"?>
<testsuites tests="3" failures="0" disabled="0" errors="0" timestamp="2014-02-26T16:51:08" time="0.013" name="AllTests">
  <testsuite name="HelloGoogleTest" tests="3" failures="0" disabled="0" errors="0" time="0.01">
    <testcase name="Size" status="run" time="0.002" classname="HelloGoogleTest" ID="0" />
    <testcase name="Value" status="run" time="0.002" classname="HelloGoogleTest" ID="1" />
    <testcase name="Clear" status="run" time="0.004" classname="HelloGoogleTest" ID="2" />
  </testsuite>
</testsuites>